
Techniques in Depth: Tie or Die
Do you remember learning to knit? Do you remember that first garter stitch scarf project? Once you got the hang of the mechanics of the knit stitch, it was plain sailing—knit, knit, knit, knit happily along—until that first ball of yarn ran out.
The scarf wasn’t nearly long enough, and your helpful friend had supplied you with a second ball of the yarn, so it was clear what needed to happen: you needed to start using the new ball. “Oh, just join it,” she said.
Without further instruction, most knitters just tie the new yarn onto the old one, and keep knitting. And it works, and all is well.
But then, More Experienced Knitters start to Offer Advice.
And the thing they feel most strongly about is that knot you made. Oh, no. No knots. Knots are bad. Knots ruin your knitting.
And the first time you hit a knot in a ball of yarn, you’re told to undo it and join it “properly,” further supporting the anti-knot message.
“But how on earth are you supposed to join the yarn without knots?” the beginner asks, not unreasonably.
As with so many things in knitting, there is no one answer, no one technique that works for every situation.
So, forthwith, I present some options for you. SPOILER ALERT: It turns out knots aren’t all bad.
Whatever You Do, Don’t Do This
Just to get this out of the way: under no circumstances do I recommend the very straightforward but rather terrible “drop the first yarn and start knitting with the new one” method. The problem with this is that you end up with sloppy stitches: the last of the old yarn and the first of the new are unanchored, and inclined to pull loose. At best, you get a small hole, at worst, stitches actually start to come undone.
A hole too big to tolerate.
You can tidy up the hole and the looseness when you weave the ends in, but this requires precision and care. Why make work for yourself?
Consider the Circumstances
Factors that will determine your strategy: is the yarn sticky/felty, or superwash/slippery? Are you working in the round, or a flat piece that will be seamed, or a flat piece that won’t be seamed? Are you changing colors? The answers to these questions affect not only the method you use to join, but also the place in your knitting where you join.
The Splice
If the yarn is felty—and let’s be clear what I mean here: if it’s 100% sheep’s wool or other animal fiber, non-superwash, non-machine-washable, hand-wash only yarn that felts up when wet—then the best answer is a spit splice. Yes, I said spit. Because it uses spit.
Divide the plies of each end of the yarn, for about three inches, and lay them end-to-end, overlapping the ends and mingling the plies.
Like so.
Then spit on it, and rub the yarns together between your hands, until they stick together, and it’s blended like a single strand of yarn.
Yes, I said spit.
Two colors are used here for illustration, but if you are splicing two ends of the same color, the join is nearly invisible.
What you’re doing is felting the yarn ends together, and the enzymes in your saliva actually help this process. You can use water, too, of course, but it’s slightly less effective and definitely less dramatic.
Some like to thin the yarn a little on both sides by removing a few of the plies along the spliced length, to reduce the thickness of the join. I’m not personally a fan of this, because if they’re not securely felted down, those little cut ends can worm their way loose. As with the next two methods, a couple of slightly-thicker-than usual stitches are barely noticeable in the fabric.

and no, I don’t bother waiting for the join to dry before I continue knitting.
bonus: the splice solution leaves NO ENDS TO WEAVE IN!
Do be careful, though. I was told a very sad tale once: a knitter made a beautiful multi-skein color-patterned baby blanket, and spliced the ends. Only after the thing had come apart in the wash did she read the ballband carefully, and learn that she had been working with superwash wool. If you’re at all uncertain, test a splice on two short lengths of the yarn. Let it dry and pull hard to see if the ends come apart.
In the Round or Flat No Seams
If you’re working in the round, or on a flat piece that will not be seamed up (that is, has exposed edges, like a scarf or a shawl) then you’ll be joining new yarn in the middle of the piece. (Joining the yarn at the end of a row is a bad idea if the edges are going to show. Unless you’re the world’s best weaver-in-of-ends, the join will affect the edge, making it bulky and untidy. It’s just less noticeable in the middle of the row.)
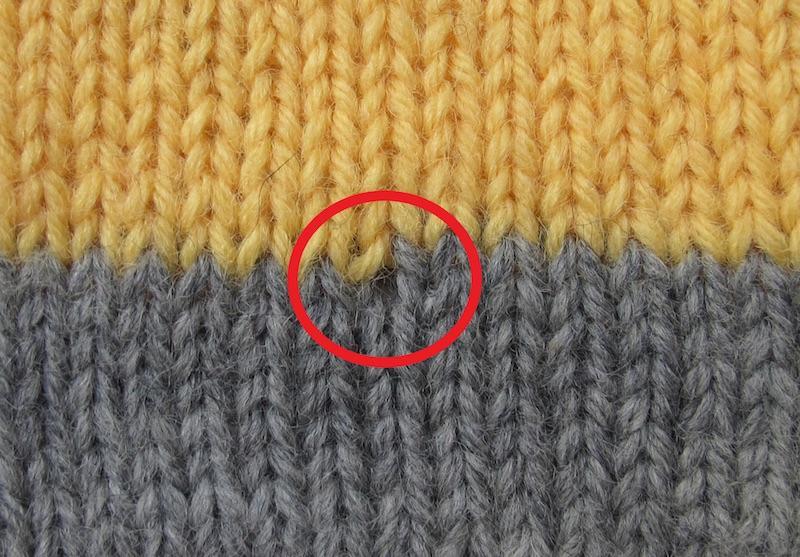
For a middle of the row join, for most purposes, I use the “two-yarns-three-stitches” method. Hold the two yarns together, end-to-end as if the new ball is a continuation of the old one, overlapping the ends by about four inches. Leaving about 2 inches dangling on either end, work three stitches with both ends of the yarn held together.

As with a splice, those three stitches will be thicker than the rest of the row, but it’s barely noticeable, particularly if you’re working with a yarn with a bit of texture.
The right side.

The wrong side.
A “Russian-style” join is also handy in this situation: leaving about three inches on each side, fold the ends of the yarn around each other:
Like so.
I like to take a darning needle and run the ends through the plies of the yarn on each side of the loop, for extra security, but this step isn’t entirely necessary.

It makes it easier to work the join, but it’s no more or less secure in the grand scheme of things.
Then just knit, making sure you hold the yarn doubled for a couple of stitches on each side of the join.
Russian join on the right side.
As with the previous method, you only want to work a few stitches with the doubled yarn, and do make sure there’s a good tail hanging on either end.

Russian join on the wrong side.
If you’re superclever, you can actually use this technique for a color change. You can measure to see how much yarn you need before the change, and ensure you place the “fold” at exactly that point.
And the best part? With both of these methods, the ends are fully secure, and if you never get around to weaving them in, you’ll still be absolutely fine.
Flat, to Be Seamed; When Changing Colors
If you’re working a flat piece that will be seamed up, then the best place to join the yarn is at the end of the row, on the seam edge. And the best way to do it: with a knot.
Yes, you heard me right: with a knot.
But not just any knot. I tie the new yarn around the tail of the old one, using an overhand knot. Pull it snug but not tight—you want the knot to be able to slide up the tail of the old yarn. This allows you to position the new yarn appropriately for the first stitch of the row, to make sure the tension is appropriate and that the last stitch of the old yarn and the first stitch of the new are tidy and secure.
How to make that sliding overhand knot.

How it looks knitted up.
If you really want, you can carefully unpick the knot when it’s time to weave the ends in. But heck, it’s hidden in a seam, so it’s not going to be a problem. (Which is to say I never bother with this myself except for massively super-bulky jumbo yarns.)
I also use this method when adding in a new color for stripes or other color work, for a clean change.
The Elephant in the Room
Yes, I know: chances are your grandmother, or some other Expert Knitter told you that Knots are Bad and Should Never Be Used.
There are two very good reasons why knots can be problematic in knitting.
One: If you cut the ends short, the knot will be inclined to come undone.
Two: a knot leaves a little lump in the fabric. A lump that will, inevitably, pop through to the front of your fabric and be visible.
The “sliding” knot solution avoids both of these problems: you’re not going to cut the ends, and because it’s going to be hidden in the seam, it won’t ever pop through and be visible.
A Side Note
The “magic knot” solution has become popular in recent years. Many swear by it, but I am a skeptic. I have tried it, and it’s not foolproof. It can come undone with a slippery yarn, or one that’s a little on the fragile side. And if it does come undone, because you’ve cut the ends short, there’s no way to mend the resulting hole, no yarn tails you can use to tidy and tie things up again.
There are plenty of other methods for joining yarn. You may already have a favorite. Great! If you like it, and it works for you, keep doing it. But if you don’t, I hope these three solutions help you expand your toolkit.
Link nội dung: https://hnou.edu.vn/tie-die-a8951.html